Jindra413
Vytvořené odpovědi
-
AutorPříspěvky
-
Jindra413
ÚčastníkOmlouvám se za dezinformaci. Udělal jsem to přesně jak píšeš. Ale když to chci opět zprovoznit, tak to stále píše nuly. Ikdyž odpojím čidlo a odpor nechám zapojený.
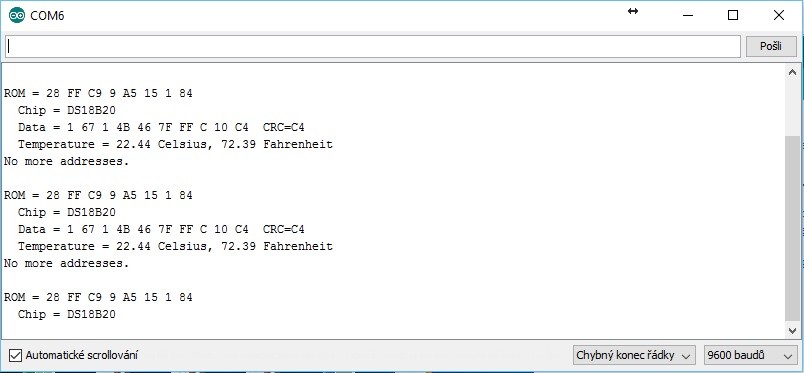
ÚčastníkNic se mi na sériovou linku nevypíše.
Pro vypisování na sériovou linku jsem používal toto:
#include <OneWire.h>
// OneWire DS18S20, DS18B20, DS1822 Temperature Example
//
// http://www.pjrc.com/teensy/td_libs_OneWire.html
//
// The DallasTemperature library can do all this work for you!
// http://milesburton.com/Dallas_Temperature_Control_LibraryOneWire ds(10); // on pin 10 (a 4.7K resistor is necessary)
void setup(void) {
Serial.begin(9600);
}void loop(void) {
byte i;
byte present = 0;
byte type_s;
byte data[12];
byte addr[8];
float celsius, fahrenheit;if ( !ds.search(addr)) {
Serial.println(„No more addresses.“);
Serial.println();
ds.reset_search();
delay(250);
return;
}Serial.print(„ROM =“);
for( i = 0; i < 8; i++) {
Serial.write(‚ ‚);
Serial.print(addr[i], HEX);
}if (OneWire::crc8(addr, 7) != addr[7]) {
Serial.println(„CRC is not valid!“);
return;
}
Serial.println();// the first ROM byte indicates which chip
switch (addr[0]) {
case 0x10:
Serial.println(“ Chip = DS18S20″); // or old DS1820
type_s = 1;
break;
case 0x28:
Serial.println(“ Chip = DS18B20″);
type_s = 0;
break;
case 0x22:
Serial.println(“ Chip = DS1822″);
type_s = 0;
break;
default:
Serial.println(„Device is not a DS18x20 family device.“);
return;
}ds.reset();
ds.select(addr);
ds.write(0x44, 1); // start conversion, with parasite power on at the enddelay(1000); // maybe 750ms is enough, maybe not
// we might do a ds.depower() here, but the reset will take care of it.present = ds.reset();
ds.select(addr);
ds.write(0xBE); // Read ScratchpadSerial.print(“ Data = „);
Serial.print(present, HEX);
Serial.print(“ „);
for ( i = 0; i < 9; i++) { // we need 9 bytes
data[i] = ds.read();
Serial.print(data[i], HEX);
Serial.print(“ „);
}
Serial.print(“ CRC=“);
Serial.print(OneWire::crc8(data, 8), HEX);
Serial.println();// Convert the data to actual temperature
// because the result is a 16 bit signed integer, it should
// be stored to an „int16_t“ type, which is always 16 bits
// even when compiled on a 32 bit processor.
int16_t raw = (data[1] << 8) | data[0];
if (type_s) {
raw = raw << 3; // 9 bit resolution default
if (data[7] == 0x10) {
// „count remain“ gives full 12 bit resolution
raw = (raw & 0xFFF0) + 12 – data[6];
}
} else {
byte cfg = (data[4] & 0x60);
// at lower res, the low bits are undefined, so let’s zero them
if (cfg == 0x00) raw = raw & ~7; // 9 bit resolution, 93.75 ms
else if (cfg == 0x20) raw = raw & ~3; // 10 bit res, 187.5 ms
else if (cfg == 0x40) raw = raw & ~1; // 11 bit res, 375 ms
//// default is 12 bit resolution, 750 ms conversion time
}
celsius = (float)raw / 16.0;
fahrenheit = celsius * 1.8 + 32.0;
Serial.print(“ Temperature = „);
Serial.print(celsius);
Serial.print(“ Celsius, „);
Serial.print(fahrenheit);
Serial.println(“ Fahrenheit“);
}ÚčastníkTen kód je převzatý, malinko upravený. Pokud to bude fungovat, měl by to být termostat, který bude zapínat či vypínat podle nastavené teploty.
// This Arduino sketch reads DS18B20 „1-Wire“ digital
// temperature sensors.
// Tutorial:
// http://www.hacktronics.com/Tutorials/arduino-1-wire-tutorial.html#include <OneWire.h>
#include <DallasTemperature.h>
#include <LiquidCrystal.h>LiquidCrystal lcd(12, 11, 5, 4, 3, 2);
// Data wire is plugged into pin 8 on the Arduino
#define ONE_WIRE_BUS 8// Setup a oneWire instance to communicate with any OneWire devices
OneWire oneWire(ONE_WIRE_BUS);// Pass our oneWire reference to Dallas Temperature.
DallasTemperature sensors(&oneWire);// Assign the addresses of your 1-Wire temp sensors.
// See the tutorial on how to obtain these addresses:
// http://www.hacktronics.com/Tutorials/arduino-1-wire-address-finder.htmlDeviceAddress Thermometer = { 0x28, 0xFF, 0xC9, 0x09, 0xA5, 0x15, 0x01, 0x84 };
void setup(void)
{
// Start up the library
sensors.begin();
// set the resolution to 10 bit (good enough?)
sensors.setResolution(Thermometer, 10);lcd.begin(16,2); // columns, rows. use 16,2 for a 16×2 LCD, etc.
lcd.clear(); // start with a blank screen}
void printTemperature(DeviceAddress deviceAddress)
{
float tempC = sensors.getTempC(deviceAddress);
if (tempC == -127.00) {
lcd.print(„Error“);
} else {
lcd.print(tempC);}
}void loop(void)
{sensors.requestTemperatures();
lcd.setCursor(0,0);
lcd.print(„Teplota: „);
printTemperature(Thermometer);
lcd.print(“ C“);int teplota = 23.00;
if (sensors.getTempC(Thermometer)>= teplota)
{ digitalWrite(13, HIGH);
}
else
{ digitalWrite(13, LOW);
}
delay(5000);
} -
AutorPříspěvky